
WordPress is one of the largest content management software around the world and powering a huge number of websites until now. One of its great feature is its extended functionality by the plugins created by a lot of programmers and developers around the world. Plugins are just like a plug in a socket which supercharge your site by the desired features it gives.
Basically, WordPress plugins are easy to install. There are two ways to install it, the automated installation via WordPress repository or by other premium themes which uses automatic installation of plugins, and the manual method which you will be needing to upload the file to be installed.
The Automated Installation of WordPress Plugin
With this method of installation, all you need to do is to find your desired plugin to be installed through the WordPress repository and install it with just a click. Another thing is, if your themes has its feature to install the plugins automatically, it can also be done quickly and please refer to the instruction from your themes. To install the plugin using this method, follow the instructions below.
From WordPress repository:
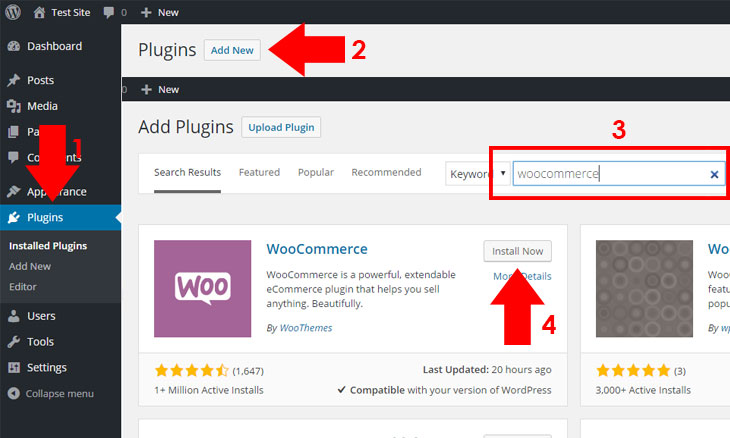
- Go to your WordPress dashboard and browse Plugins Add New.
- Search for your desired plugins by typing the keyword(s) to the search input, like for example, “woocommerce.”
- Click Install Now and wait for the plugin to be installed.
- Click Activate Plugin to activate your downloaded plugin.
- Congratulations! You have installed your desired plugin from the WordPress repository. You should configure the plugin based on the instruction of the plugin’s author.
From some Premium WordPress theme:
- If you have installed your theme, you will find a notice bar on the top, indicating the required or the recommended plugins you should install.
- You should click Begin installing plugins from the notice bar to view to list of required and recommended plugins to be installed, or click the plugin names one by one from the notice bar.
- To install each plugin, click Install.
The Manual Installation of WordPress Plugin
With this method, you can install your plugin by uploading it to your site. To install the plugin using this method, follow the instructions below.
- Prepare your WordPress theme. You should have a .zip version of your plugin. If you don’t have a .zip version, compressed your file using Windows default program or other file archiver such as 7-Zip.
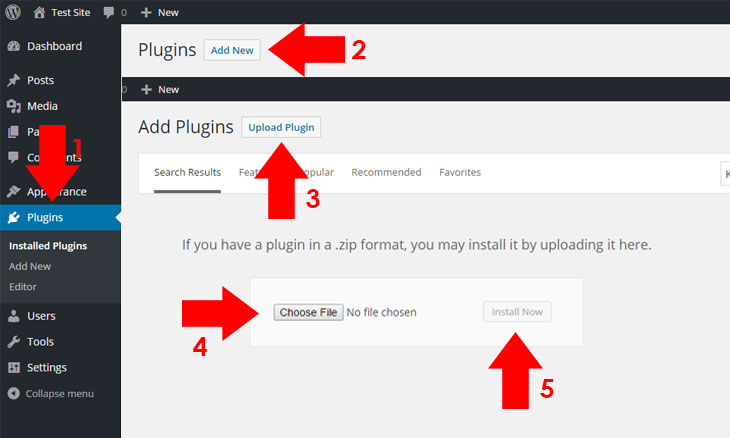
- Go to your WordPress dashboard and browse Plugins Add New Upload Plugin.
- Click Choose File to browse the file (myplugin.zip) from the directory of your computer.
- Click Install Now to upload your plugin file.
- After uploading, click Activate Plugin to activate the plugin.
- Congratulations! You have installed your desired plugin from your computer. You should configure the plugin based on the instruction of the plugin’s author.
Installation of a WordPress plugin is simple, just follow the instructions above. This post may be about plugin installation but an idea sparks in my mind if it is necessary to make the installation of it automated within a theme. In my view from most themes that I have created (as a theme author), I didn’t include the TGM plugin (a plugin which theme author uses to make plugin automated by indicating the recommended and required plugins to be installed displayed at the notice bar) to it because I want my customers to learn how to install plugins as simple as it is in a typical way of installation and to avoid an issue. Also I don’t add too much plugins from my themes to make it faster. Maybe if the theme has a lot of plugins required or recommended, it is necessary to use it.
How about you, do you want to make installation of plugins integrated within a theme? Do you install plugins manually or automatically? Feel free to add your comments below.