
WordPress themes are very essential to the WordPress industry. It empowers your WordPress enabled sites with features and elegant design for maximum efficiency. Being popular, WordPress themes are divided into two groups which is the free and premium one. Commonly, the free ones can be installed easily from the WordPress repository page by searching, adding and installing it through the Themes sub-section under Appearance section of your WordPress dashboard. To manually install the themes especially for premium themes, you can choose from the two methods of installing a WordPress theme below.
Method 1: Via WordPress
This method is the easiest method of installing your WordPress theme. By uploading and installing it, your theme is ready for activation. To use this method follow the instructions below.
- Prepare your WordPress theme. You should have a .zip version of your theme. If you don’t have a .zip version, compressed your file using Windows default program or other file archiver such as 7-Zip.
- If you have a .zip version of your theme, log-in to your WordPress site admin page.
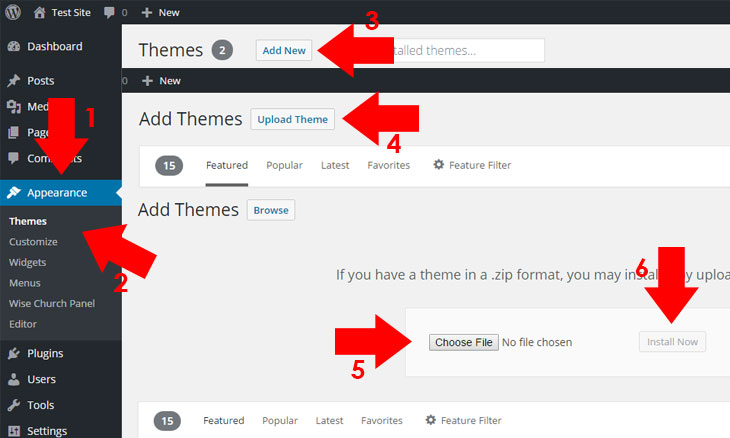
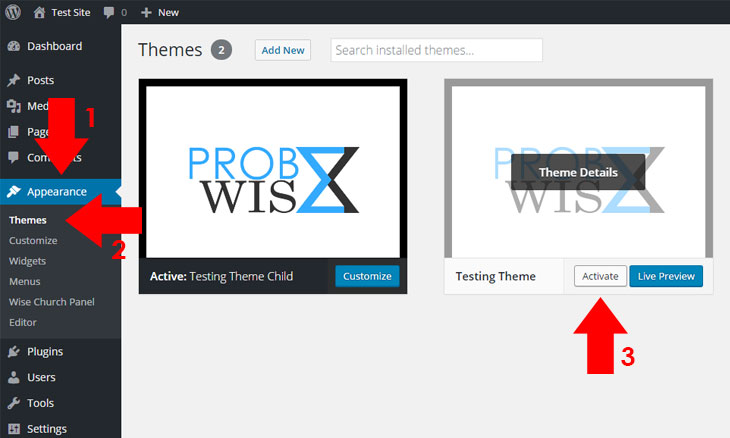
- Go to Appearance Themes Add New Upload Theme Choose File.
- Browse your theme file (mythemefile.zip) from your computer directory.
- Click Install Now, then Activate to activate your theme.
- Congratulations! Your theme is now activated. You may now configure your theme based on the instruction provided by the theme author.
Method 2: Via FTP (File Transfer Protocol) Client
This method is identical to the previous method of WordPress installation but different in terms of adding your theme file to your server. The previous method directly uploads your theme file, while this method uploads your theme file through your server. To use this method, follow the instructions below.
- Log into your FTP client to gain access to your web server. If you don’t have an FTP client installed to your computer, consider installing a free FTP client like FileZilla.
- In your FTP client, locate your theme file in .zip format. If it is already opened from your windows, you can drag it to your FTP client.
- Browse and upload the theme file to your WordPress installation themes directory (wp-content/themes).
- Extract your .zip theme file using a built in extractor from your FTP client which will create a new folder on it.
- Go to your WordPress Dashboard and browse your theme from Appearance Themes.
- Choose your uploaded theme and click Activate to activate your theme.
- Congratulations! Your theme is now activated. You may now configure your theme based on the instruction provided by the theme author.
Installing a WordPress theme is just easy. You can do it yourself by following the instructions comprehensively. If you have just an issue installing your theme like permission issues, you should ask your web hosting provider to gain you an access or permission to upload a file from your web server. If you are having other issues on installation especially if you bought your WordPress theme from a marketplace such as Themeforest, you should contact the author of the theme to help you out from the specific issue.