
Contact form for WordPress is popular in terms of support for customers. Plugin developers creates contact form WordPress plugin to make it possible to dynamically integrate contact form for WordPress. But do you know that there is more efficient way to reach out your customers through your website? How? Live chat features was then introduce to websites.
In WordPress, there are many live chat plugin you can choose from. Others are free but with additional payment for extensions. One thing I’ve found which is one of the best contact form for WordPress is the WordPress Live Chat Plugin from Screets. Why did I say that it is one of the best? Let us check it out.
WordPress Live Chat Plugin Review
- It is cheap. From CodeCanyon, you can purchase it for $18 price. Remember, not all cheap means low quality, and not all expensive means high quality. It is your own judgment based on its features and efficiency.
- You can purchase it in one-time payment. Other chat plugin for WordPress charges per monthly basis but with this plugin, you should only pay once. However, if you want to extend support, you should purchase an extended license. But with the plugin, you can have unlimited updates and unlimited installation on your websites.
- It is open source (100% GPL), meaning to say, you can install it to unlimited sites as long as you like. License is only suitable for a single site you have registered which only covers for support.
- It is simple but elegant. You may find that its interface is beautiful and user-friendly. You can configure its colors and other configurations as well.
- It is compatible with WPML, meaning to say it supports different languages with a click.
- It is continuously updated and compatible to the current WordPress and PHP version.
- From the new update which is 2.0+ version, it uses Firebase as the chat server which is faster that using the previous one (version 1.5) that uses AJAX. It is also secured because it uses Firebase.
Before, I was skeptic about its newest update that uses Firebase because in my first time of installing it, it doesn’t work unlike the old version which automatically works with few configurations. But then I realized that it is my mistake from configuring the plugin. It should be configured properly to avoid “Please wait… Connecting…” notice. If you have decided to purchase this plugin or you have already purchased this theme, I wrote a guide on how to configure WordPress Live Chat Plugin properly.
How to Configure WordPress Live Chat Plugin
Configuration of WordPress Live Chat Plugin is simple if you will follow the instructions below as well as the video instruction included in Live Chat Real-time tab.
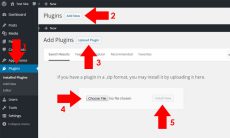
- You should install the plugin. Please refer to our blog articles about plugin installation, How to Install Plugin for WordPress. If you have already installed the plugin, you can skip this step.
- If you have purchased a theme which this plugin is bundled, you can skip adding your license because the plugin will work without license. But if you want support from the plugin author, you can opt to purchase a license from them.
- Generally, required configuration must be configured. Navigate to Live Chat Options Site. You will notice that there is an indication for the required fields. Add details to the required fields shown in the screenshot below.
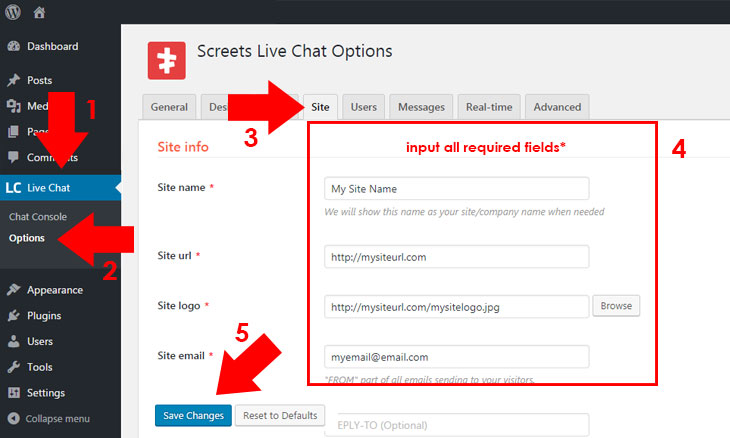
- Save settings.
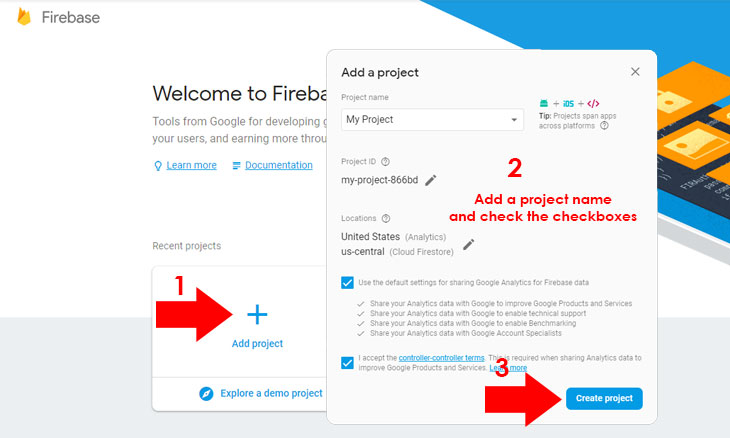
- Before configuring the Advanced tab, create a Firebase account here. Creating a Firebase account means creating a Google account because the old Firebase migrated/joined to Google. If you have a Google account, you can use that account to login here.
- Create a New Project. Add a name you want, then click Create Project.
- For authentication or permission navigate to Authentication Sign-in method.
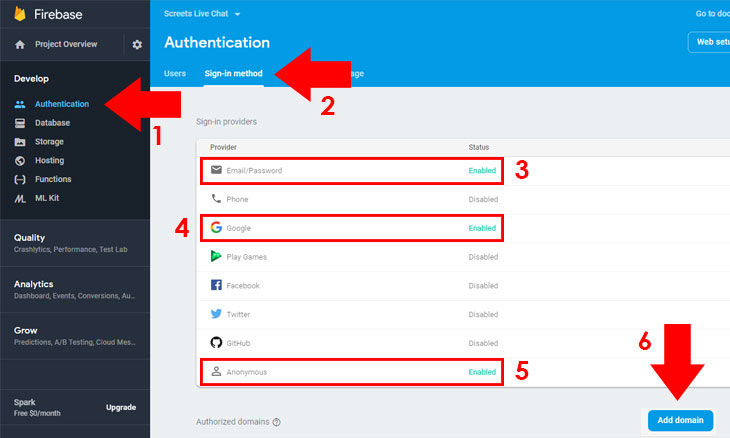
- Firstly, from Sign-in providers, enable Email/Password, Google and Anonymous.
- To add Authorized domains, click Add Domain and input your domain/site URL (for example, www.yourdomain.com, yourdomain.com, localhost, your-project-name.firebaseapp.com ).
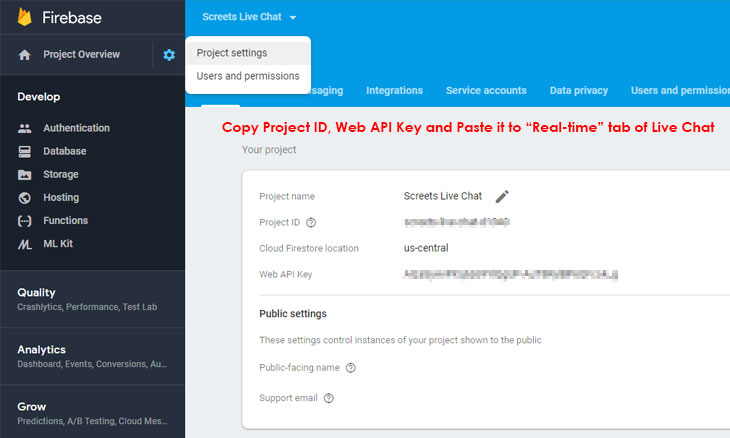
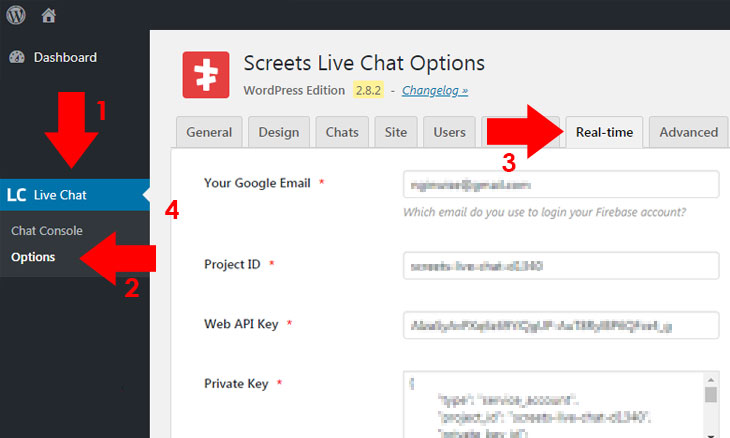
- To obtain your Project ID and Web API Key, click Project Settings General. Copy and paste Project ID and Web API Key to Live Chat Options Real-time.
- To obtain Private key, navigate to Project Settings Service Accounts. A .json file will be downloaded.
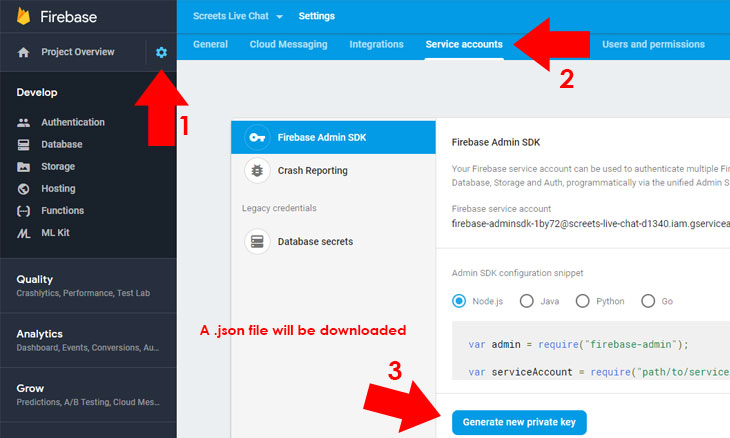
- Open the .json file in a text editor, copy the private key.
- Copy the Private key text and paste it to Real-time tab of Live Chat Options.
- Click Save Changes.
- Go to Live Chat Chat Console, then Sign-in. A message will appear that you should Update Security Rules.
- To update Security Rules (from Live Chat Options Real-time), copy and replace the security rules from Firebase Project (Database Rules Publish).
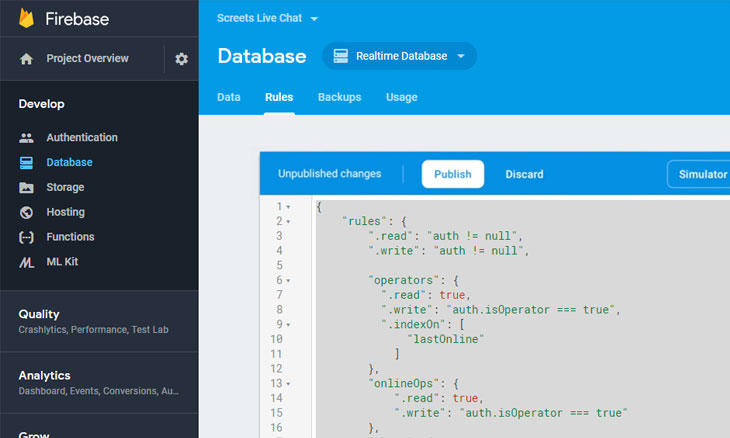
- Go back to Live Chat Console, and if it is properly configured, it will connect.
Conlusion
WordPress Live Chat Plugin from Screets is one of the best chat plugin for WordPress. With its flexibility, security and other undeniable features, it is a whole lot package for its cheap one-time payment to reach out your customers with ease and happiness.
If you are still having issues about the plugin, please contact its plugin developer as I am a customer like you who shares experience about the plugin. By the way, I have created a theme which this plugin is bundled. On your thoughts, is this plugin one of the best WordPress chat plugin? Feel free to add your comments below.