
One of the great features of WordPress is the ability for a site to create dynamic menus based on your preferences. With this feature, we can easily implement a good way of creating menus for WordPress. All you need to do is to navigate to the Appearance section, then Menus, and you can create, customize or delete menus according to the assigned menu for your WordPress theme.
This tutorial is entitled, how to create WordPress navigation menu because generally, this feature is intended to create a menu for navigation menu of your theme, otherwise there are other functionality for creating menus based on your theme’s preferences. To start with, I have a simple guide for you to create navigation menu for WordPress.
Creating a new menu
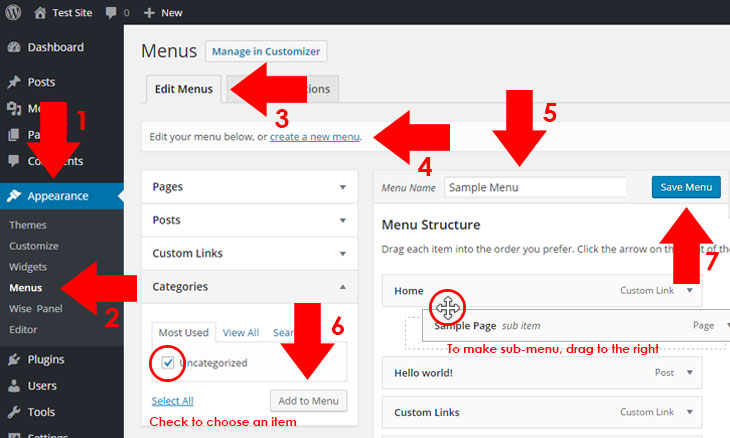
- Go to your WordPress dashboard and navigate to Appearance Menus.
- To create a new menu, enter your desired menu name and click create a new menu.
- After creating a new menu, you will notice that it is still blank. To add items for the new menu, browse to the left side part of the page and choose from its section, take for example, Page section.
- Choose an item from the bottom of the section by checking the checkbox, then click Add Menu. You can add an item as much as you want and arranged it according to your preferences and if you want to add sub-menu, just drag a little bit to the right side of an item (shown in the screenshot above).
- Click Save Menu to save your current menu.
- Congratulations! You have created your new menu.
Assigning a menu
You’ll notice that nothing has change to your theme’s navigation menu or other menus within the theme. This is because you need to assign your created menu to your desired assignment based on the theme’s preferences. To assign a menu, follow the instructions below.
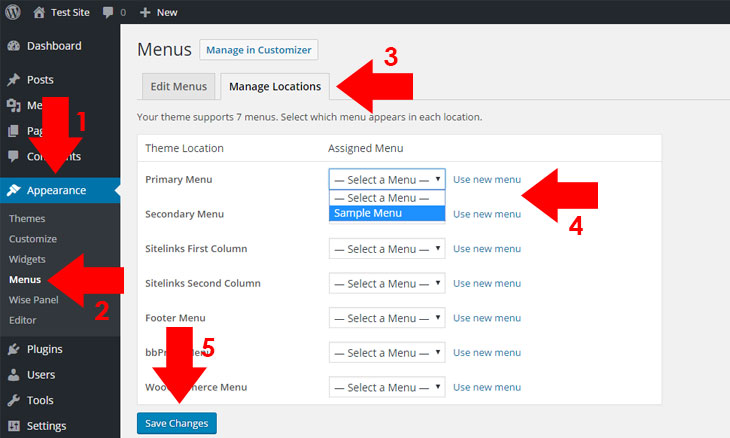
- To assign a menu, click the Manage Locations tab right after Edit Menus.
- From your theme menu location, assign your desired menu to choose from the drop-down menu.
- Click Save Changes to save your configurations.
- Congratulations! You have assigned your menu(s) which will reflect to your theme’s preferences, like for example, for navigation menu.
Creating menus for WordPress is intended to be useful for both newbies and advanced users and dynamically easy to implement. By following the tutorials carefully, you can create a better menus for your site, making you to adapt WordPress interface related to it as well.
By the way before I forgot, one of the main issue on the first time I have created my menu is to add an item on a section which is not listed on the lists on the left side of menu interface. Like for example, I have installed bbPress and there is no way I could find out on why its item is not listed on the lists. But I have figured it out by clicking Screen Options at top right side of your page and checking the checkbox about bbPress items. And wow! My expected item just shows up.
How about you, do have an issue creating your first WordPress menu? Feel free to add your comments below and I will try to answer your questions based on my experiences.